How to create a client portal and is it difficult?
Well, in our humble opinion, it’s as difficult as you want to make it.
You can try your luck with sticking different free tools together until they make up a creature resembling a client portal by combining Google Sheets with Notion, Trello, Asana, and any live chat app.
Unfortunately, that will not only be time consuming, but it will also be pretty frustrating, as these apps were simply not made to work together smoothly, put on top of switching between a whole lot of tabs.
Taking another route, you can go for project management tools that add a client portal feature as a nice add-on. However, this may not necessarily meet your client portal needs, since they usually lack finesse in the UI, client communication, or overall interactiveness in your client portal, providing view-only options.
What to go for then?
To build your client portal in as little time as possible, yet deliver the best results, we suggest going for a dedicated, no-code option — a client portal software that comes in an easily accessible web app.
And in this guide, we’ll show you exactly how to achieve that in 4 simple steps using one intuitive tool — Zendo.
Objectives, AKA Defining Your Client Portal
Getting right into it, the first thing we need to do is set the objectives for our client portal and write them down.
There are different features you may want to go for, depending on the nature of your business or your needs. After all, client portals come in all shapes and sizes.
But for the purpose of this guide, let’s say we want our client portal to have:
- a welcome page,
- a dashboard,
- a chat for client communication,
- services & orders,
- forms & requests,
- payments/checkout,
- quotes & invoices,
- file sharing,
- external apps for project feedback & reports,
- advanced customization & white labeling.
⛏️ Tool used: Zendo
⏱️ Time taken to build the client portal: 30 minutes
💰 Money spent to build & maintain it: $24.50/mo
Create A Client Portal: Step-By-Step Guide
Wasting no time, let’s jump right into the four steps we should complete to create a client portal using Zendo.
Step One: Work On The Sidebar
First things first, we have to make sure we have all the blocks of our client portal in place. To do that, we’ll work on our client portal’s sidebar.
After signing up to Zendo, go to Client portal under Settings & Customization on the left-hand panel, and choose Sidebar from the drop-down options.
Right then you’ll see the default client portal every new Zendo workspace is equipped with.
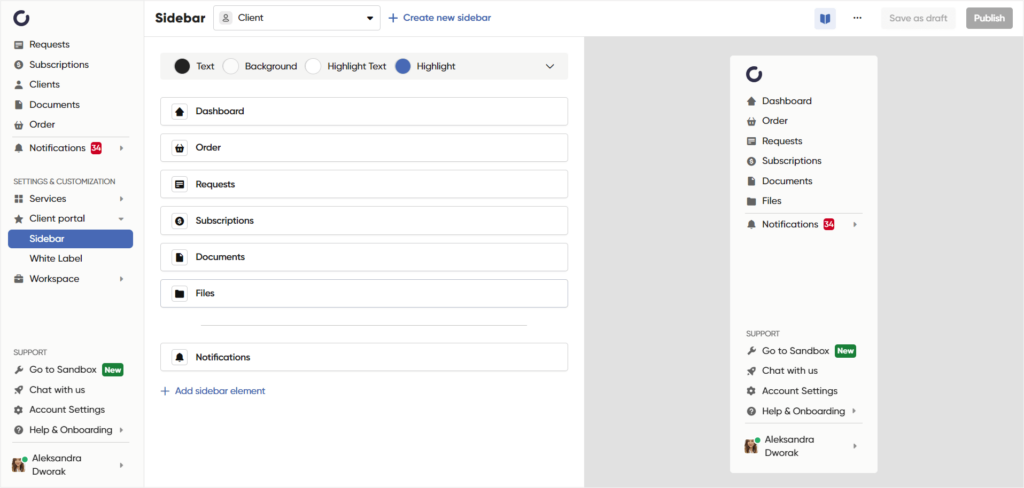
It includes:
- a dashboard — so that your clients can easily check on any recent quotes/invoices, shared files, submitted requests, or their subscriptions to your services, in one unified place,
- an order page — so that they can easily access your Service Catalog, browse through the listed services and make purchases,
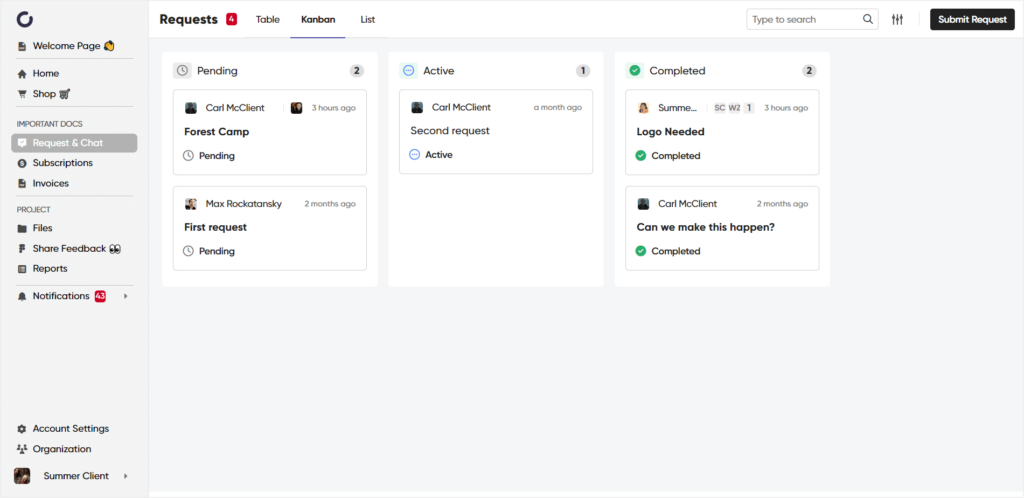
- requests — so that they can submit new requests and chat with your team on any ongoing conversations or projects. The Requests tab collects all your requests in different views, from Kanban to list, and adds a real-time chat for communication on top,
- subscriptions — so that they can check on their purchased subscriptions, if you decide to offer them,
- documents — so that they can easily access documents, aka their quotes and invoices,
- files — so that they can easily browse and download any shared files,
- and notifications — so that they can check on any recent activity and access their notifications settings to switch things up if they feel over or underwhelmed by the amount of alerts.
And if that’s enough for your idea of a client portal, you may safely move on to the next step.
But since we’ve set a bit more extensive objectives for our solution, we’re going to add a few additional elements, and customize the default ones to fit the client portal we’re building.
Add A Welcome Page
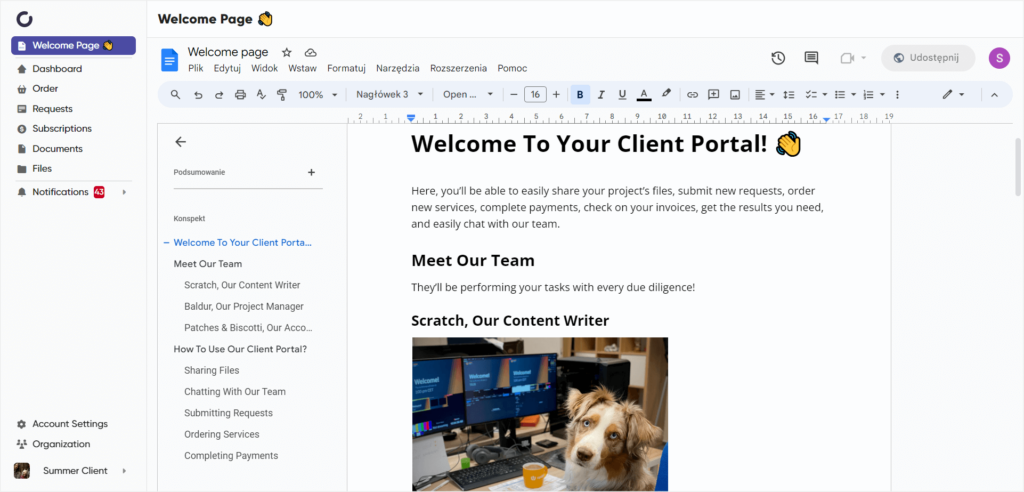
To add a welcome page, click the + Add sidebar element button and choose App.
And since we’ve prepared our welcome page in a publicly-accessible Google Docs document, we’re going to choose Google Docs as our app of choice.

Next, click + Add app, fill in the shareable public link to your welcome page, and change the slug and the name of this element to “Welcome page”.
We also dragged our welcome page to the top of our client portal’s sidebar, so that it’s the first thing our clients click onto.
💡 Tip! Just because we made our welcome page as a Google Docs document, doesn’t mean that you have to do the same. Zendo allows embedding different apps, from AirTable to YouTube or Loom. So instead of a written welcome page, you may as well greet your customers with a nice introduction video you’ve shared on YouTube, or a Loom recorded walk-through of your client portal so that they can quickly grasp how it works.
Add A Project Feedback Page
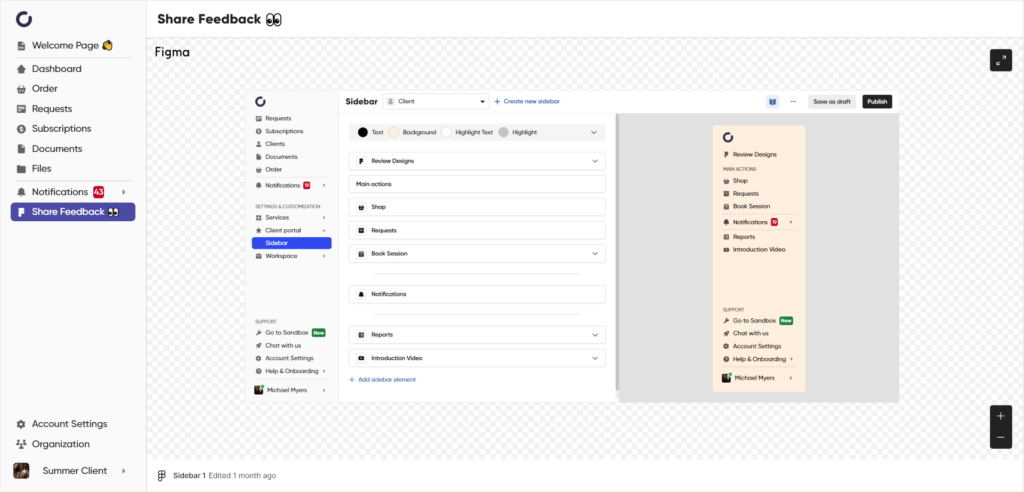
Similarly, if we want to make sure that our clients get the easiest possible access to their projects and follow their progress smoothly, we can share it through another embedded element in the sidebar.
We’ve been focusing on Google Docs, and our project may as well be shown using that app. However, just to show the sheer variety, we’re going to embed a Figma file for our project feedback element.
Again, click the + Add sidebar element, but this time, choose Figma from the available app options.
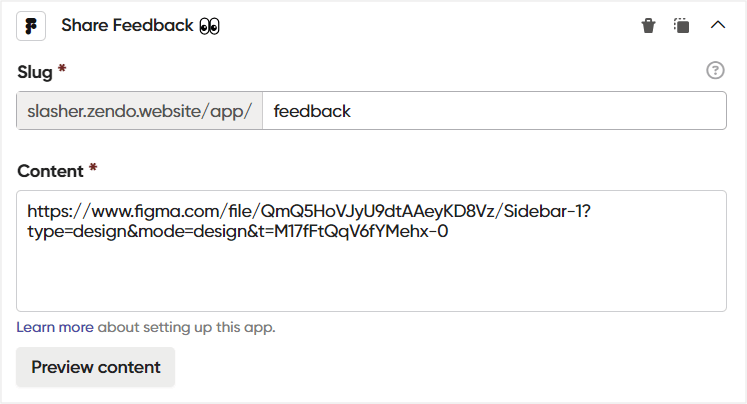
Next, in the content field, paste in the shareable Figma link to the designs you want to share, and change the slug of this element to feedback and the name to Share Feedback 👀.
💡 Tip! You may want to keep the projects’ details or feedback specific to certain clients or client groups. In that case, we suggest creating personalized sidebars specifically for those clients, adding the elements only certain people should see.
Add A Reports Section
In the same vein, we’re going to work on adding a reports section to our client portal by simply embedding Google Sheets.
Again, we choose + Add sidebar element and choose the prospective app. In this case, Google Sheets.
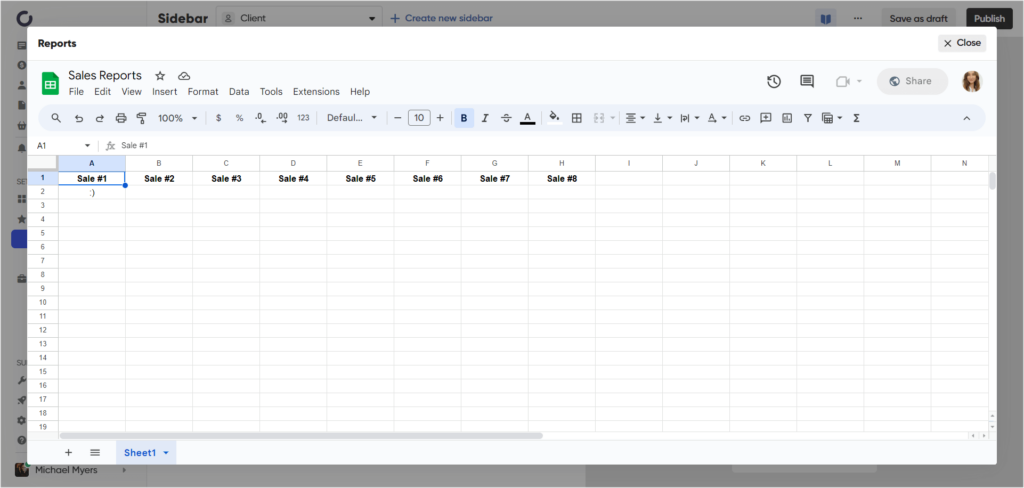
While adding this element, we went ahead to check its preview, making sure everything will look just as we’d want it to. In the content field, choose the Preview content button that will ignite a preview popup to appear.
💡 Tip! If you want to make sure the client portal you’re creating will be perfectly polished before officially launching it to clients, Zendo gives you the option to save your new creation as a draft or even work on it in a special testing environment called the Sandbox.
Next, simply change the slug and name of this new section to Reports, and go ahead and paste in the shareable link to your Google Sheets reports.
Adjust The Colors & Organize It
To further customize our client portal and make things tidier, we’re going to switch up our client portal’s colors, rename a few of the elements, as well as add a few dividers & labels to make sure everything’s nice and organized.
Zendo’s client portal sidebar works on the WYSIWYG basis, showing a live preview on the changes you’re making on the right side of the screen, making the whole tidying up process extremely easy.
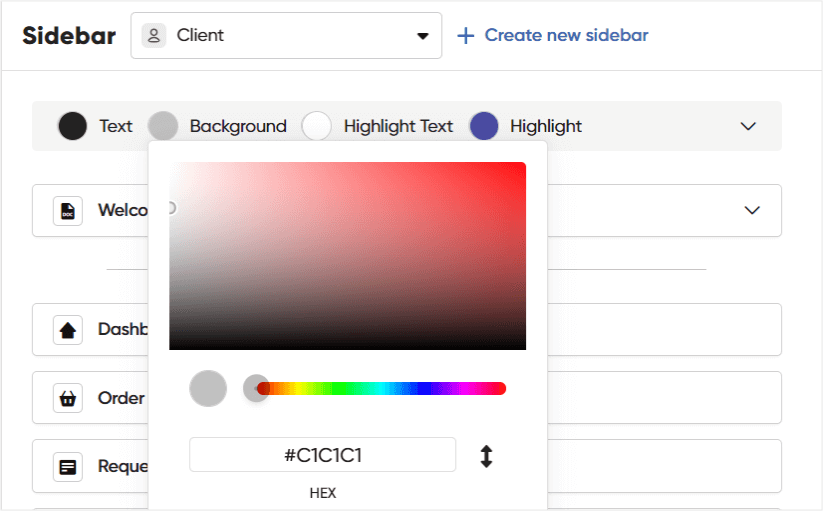
Now, to change our sidebar’s colors, we simply click on the elements we want to change the color of. So let’s say we want to change the background and highlight colors; we chose #F4F4F4 for the background color and #B2B2B2 for the highlight.
To add dividers, we simply click the + Add sidebar element, choose Divider and move it around to find the perfect placement.
Next, we want to add our section headings to help divide our client portal categories. Once added, we can move them around to sit above our selected sections or elements, and rename them accordingly. For example, putting an Important Docs label above our invoices, files, and reports.
Once all the changes have been made and we’re sure we want to share our new client portal with our clients, we simply hit the Publish button.
The end result can be easily double-checked from the client’s POV, either by creating a test client account and logging in to our client portal or simply using the impersonation feature, temporarily taking over one of our client’s accounts.
Step Two: Add Your Services
If you run a service-based business, Zendo will also make it effortless to add your services and sell them within and outside your client portal.
You can add productized, custom, free, and subscription-based services, collect payments, create whole checkouts, order forms, and more.
So to really seal the deal with our tutorial, we’re going to add 3 services and work on our Service Catalog and order forms.
Under Settings & Customization, go to Services > Overview, and click the Create service button.
Choose the service type you want to add, selecting from productized, subscription, custom, and free services.
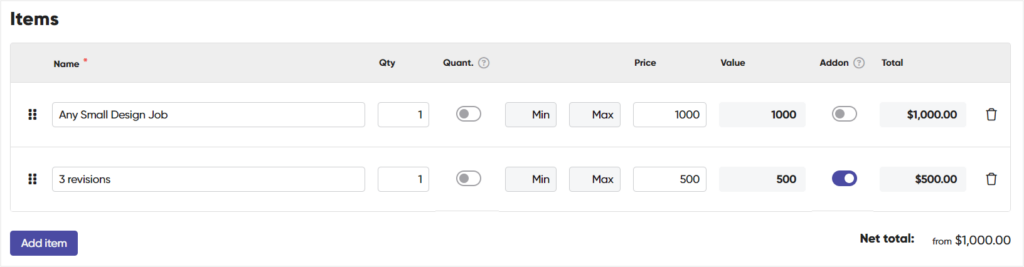
If you choose productized, you simply add the specific items of your service and price them accordingly. Here, you can easily upsell your offer with add-ons and quantifiable items.
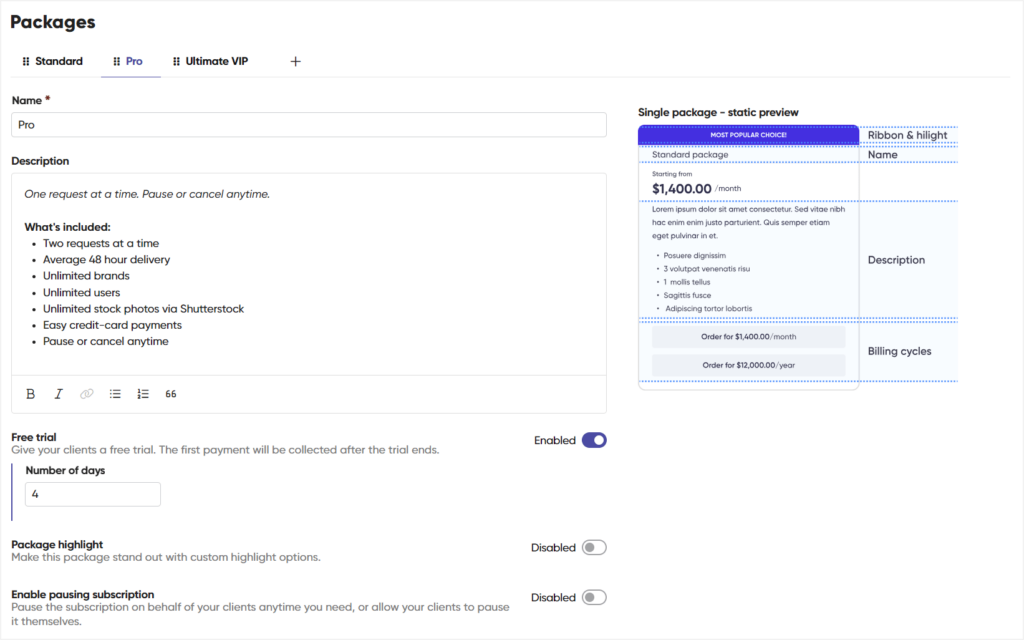
With subscription-based services, we have the option to create different packages with additional options, such as adding free trials, highlighting favorite offers, allowing pausing & canceling, discounts, and varied pricing for different billing cycles, from weekly to annual.
In turn, custom services give you the space to describe them to clients without purchasing anything up-front. While free services are for anything you want to offer free-of-charge, be it traditional inquiries, support tickets, or anything else.
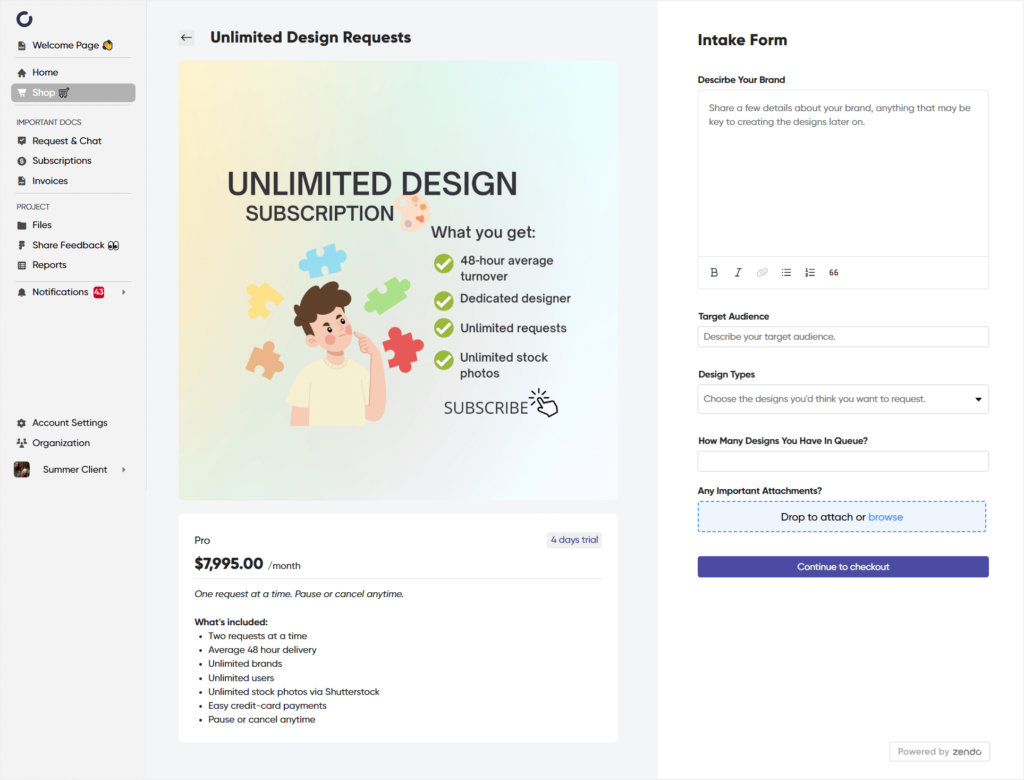
Each service comes with the option to add a customizable intake/order form we can build from various fields, from file uploads to multi-select boxes.
And to make things a bit prettier, we can also customize individual order pages for each service we create, which include descriptions & images in the step preceding our checkout.
All of this can be tied together with a whole Service Catalog as our bow. Although optional, since you can link from the buttons on your website directly to each service’s checkout and make things even more smooth, a Service Catalog is a nice add-on to your client portal specifically.
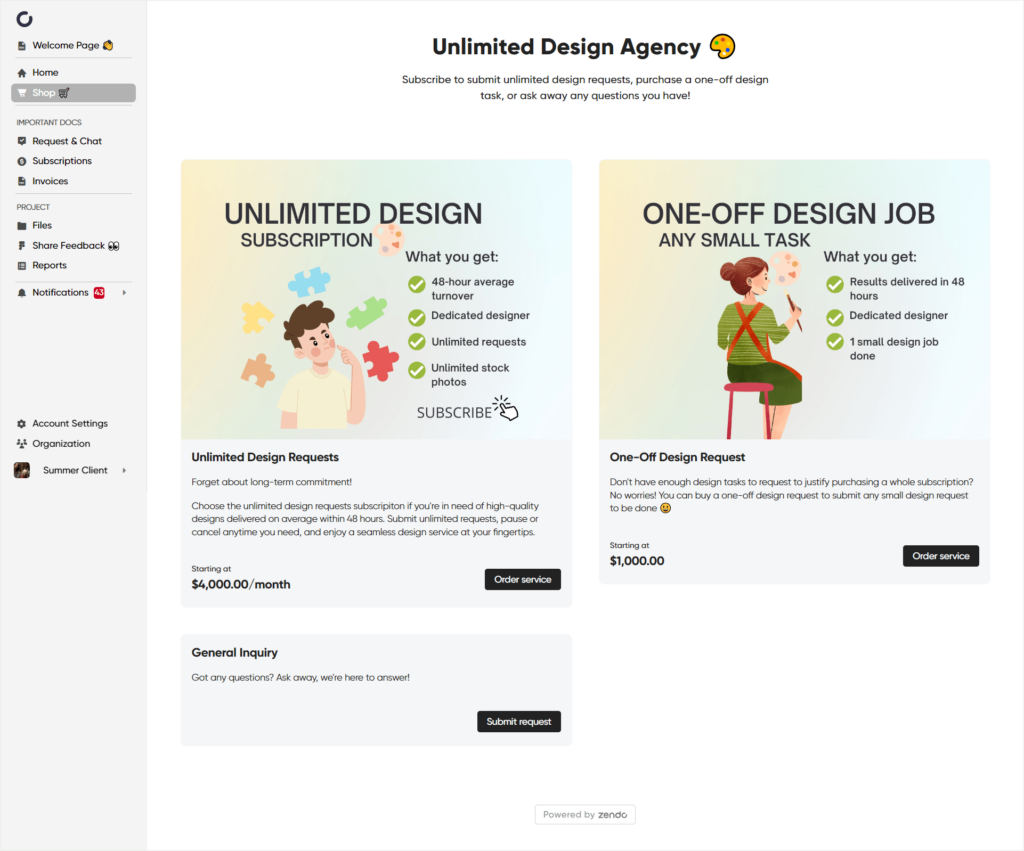
Why?
Because it makes it easy for your clients to order new services directly from their client portal space. Once they’re there, no tab switching will be required.
By default, it comes in as an Order tab. However, as with every previous tab we’ve worked on, we can change it to anything else.
For this one, we’ll rename it to Shop 🛒, and move it higher up on the sidebar. That way, our clients will be able to easily access our services and make future purchases.
Step Three: Customize & White-Label
What would it all be without a good dose of customization and white-labeling?
Since we don’t want to make the carefully crafted client portal look like it belongs to someone else or comes from a third-party provider, we’re going to make a few adjustments in the settings of our workspace.
To complete this step, head over to Workspace under Settings & Customization, and find the General tab on the drop-down menu. Clicking on the General tab will lead you straight to your workspace’s settings, including all the customization we want and need.
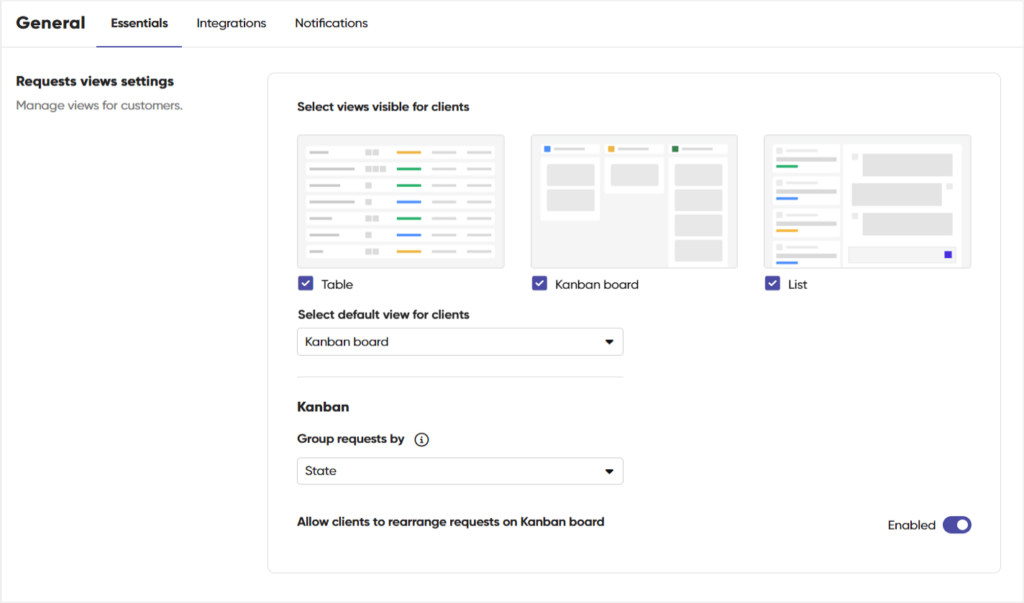
Once there, staying in the Essentials tab comes with the option to change our company name, personalize the requests view for our clients, choosing if they should see all three views, from list, to table, and Kanban, and which view should be the default one displayed.
Additionally, we can decide who should be granted access to our client portal, anyone with a link or just invited clients.
Besides that, we get a few additional options, such as setting default workspace language (we can choose from 12 languages), time zone, or date and time formats we prefer.
However, we all know we mean something more when hearing of a customizable client portal. But don’t worry, advanced customizing & white label settings can be found in a different tab.
Heading to Client portal under Settings & Customization, and choosing White Label, will get us exactly where we need to be.
And here, we get three main areas to work on, starting with the general tab, going through our sign up & login page, and ending on our email settings.
General
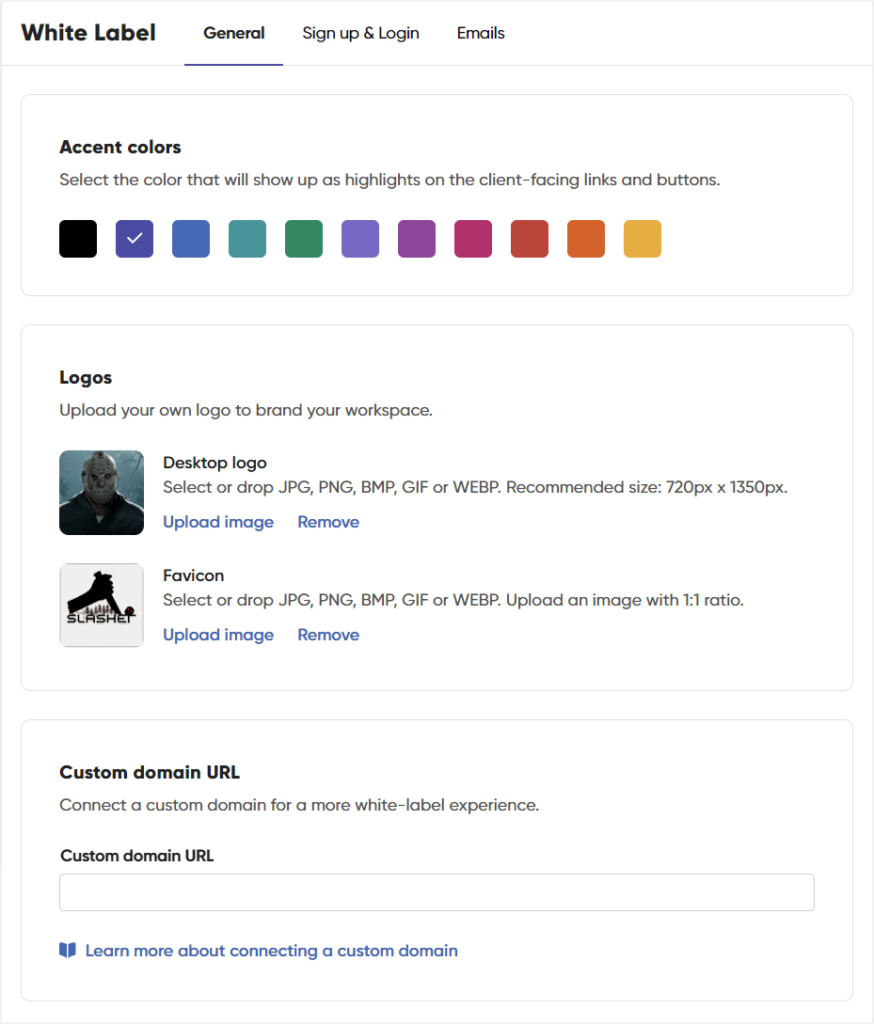
The General tab is where we set the main theme of our customer portal: choosing our preferred accent color, adding our logo & favicon, customizing our very own chatbot, changing its name & avatar, connecting our own help center, as well as terms of service links.
This is also where we can completely remove any “Powered by Zendo” branding, so that any trace of a third-party provider is wiped out.
But, most importantly, that’s the place to make an official connection to your business website, whether it’s built on WordPress, Squarespace, Wix, or any other provider or builder, you can easily connect it with Zendo.
Completing the custom domain settings ensures that your client portal shows up on your website’s URL, making the whole experience much more coherent and cohesive for your clients.
Sign Up & Login
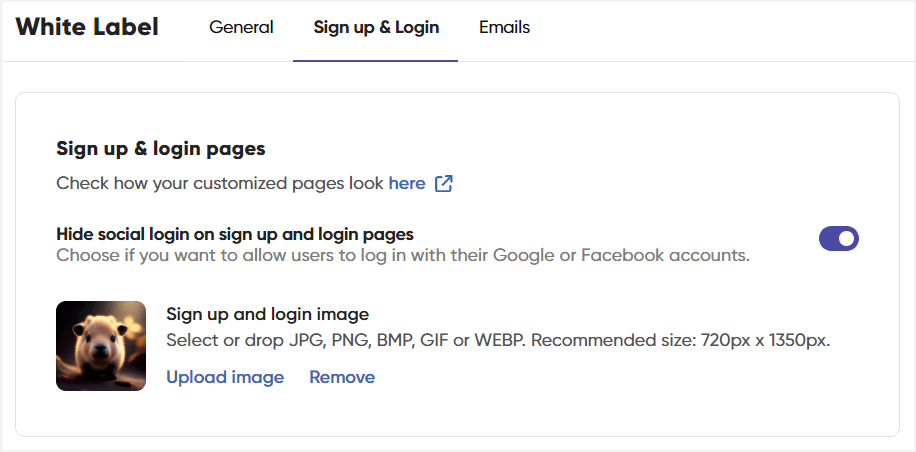
In the second tab we can work directly on the sign up and login page our clients or team members will be using to create their own accounts on our client portal or simply log in to use it.
Here, we can add our own image to that page or remove any images so that the signing up and logging in box is centered out, ensuring a minimal and clean look.
That’s also the tab we’re going to use to allow or hide the possibility of logging in/signing up using existing Google or Facebook accounts.
Emails
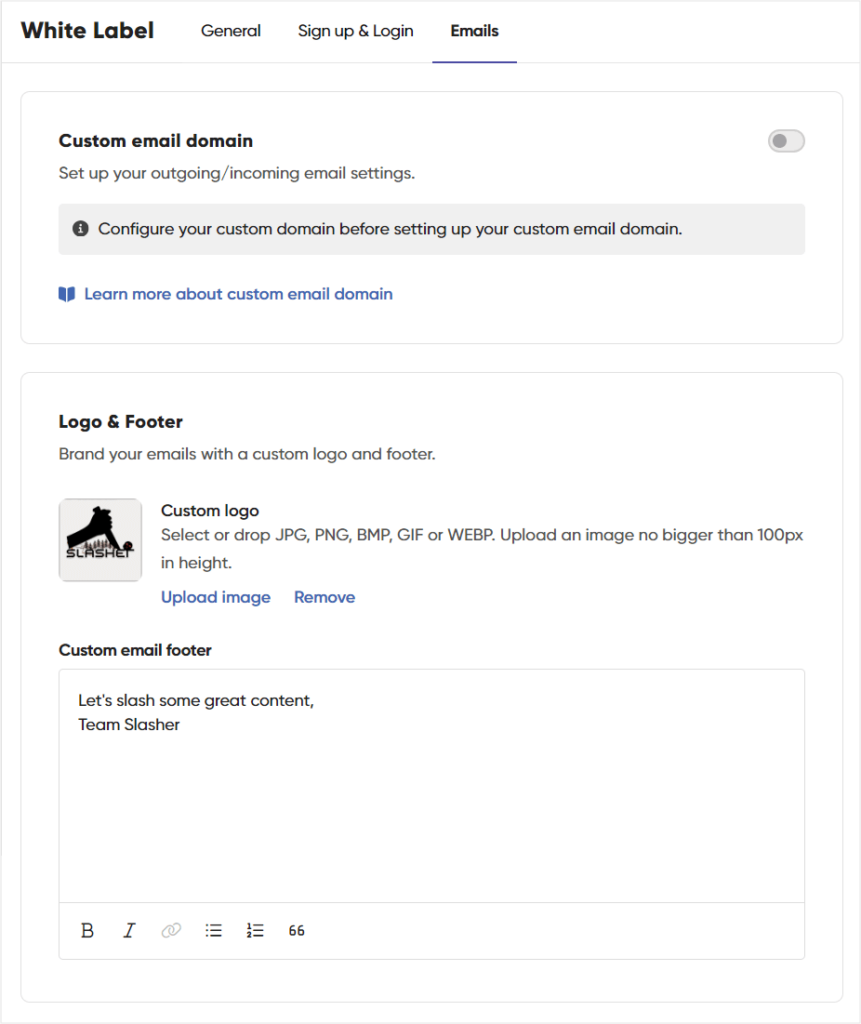
Last but not least, we can connect a custom email domain, so that any outgoing client portal emails come from our own domain, not the Zendo provided one.
To add some final touches, we can also spice up our emails by adding our own logo and personalizing the footer note.
Step Four: Invite Your Clients
As a sweet cherry on top — now it’s time to puff your chest and add your clients into the equation, showing off your brand new client portal.
To give your customers access, head to the Clients tab found on the left-side panel and either copy an invitation link or invite clients directly by email.
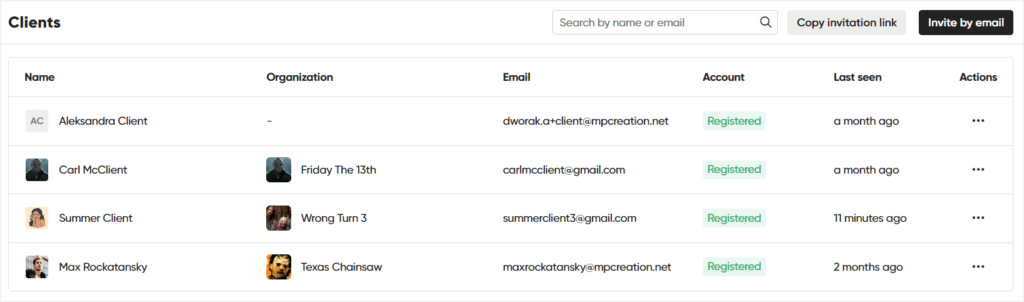
The invitation link can be easily connected to your website, either in a separate Client portal or Members page, or directly under a button you add.
Inviting by email is perfect for manually adding any existing clients we know of, simply by pasting multiple emails in Zendo and pressing Send invites.
Once you invite your clients, using either method, they’ll be able to sign up and set their own passwords, ensuring a secure client portal.
Signing up to your client portal keeps your clients up-to-date even if they’re not logged in.
Email notifications, which can be personalized per each account, make sure your clients stay on top of the business with no effort. New message, request, status change, or invoice issued, they’ll be the first to know.
Surprise Your Clients With A Professional Tool
With the rising customer expectations, back-and-forth emails or glued together makeshift solutions simply no longer cut it.
Instead, you can impress your clients using a dedicated client portal software.
That way, you’ll be sure to save yourself from all the frustration and countless hours spent trying to build a client portal from the ground up using unrelated tools, and grant yourself some peace and immediate solutions instead. Zendo comes with a pleasant learning curve, and carefully crafted UI ensuring ultimate intuitiveness.
Using this tool, we’ve built our client portal in under 30 minutes, setting up everything from services and a client portal sidebar to embedding external apps and taking advantage of a myriad of white label options.
This tool makes building your very own client portal an absolute breeze, and comes with unlimited clients for which you can create personalized portals sharing private data safely.
Moreover, our Zendo client portal can be easily connected to any website, from Wix, Squarespace, WordPress, or any other, ensuring a smooth customer journey, from start to finish.
And if the default client portal we’ve shared in Step One of our guide feels sufficient for your client portal needs, you’ll be happy to learn that Zendo comes with a free forever Essential plan that gives you just that, sprinkled with some sweet features on top, completely for free.

Frequently Asked Questions: How To Create A Client Portal?
What Are Customer Portals?
Customer portals are secure, password-protected spaces for clients to easily share files, access project or order information, complete payments, check on invoices, get in touch with the seller, and more. They can come in many different sizes and forms, however, dedicated client portal software offers such a solution in the form of easily accessible web apps.
How To Create A Client Portal?
Just as many client portal shapes, there are as many ways to create a client portal. Some go for DIY solutions, like sticking together different tools, such as Trello + Google Sheets + Asana + Slack, while others go for ready-made, yet customizable options, such as dedicated client portal software. The latter is a much more efficient option, while staying affordable.
Is Client Portal Software A Good Option?
But using a client portal software is not only going to save you a whole lot of time, it also comes with a myriad of benefits. For one, it gives clients access to everything you want to share with them, from completing payments to files or your team’s communication channel, all under a secure connection, being it’s password-protected. For two, it’s fairly cheap, some even offer free forever plans. For three, it’s way easier than any DIY option you can think of.
How To Create A Client Portal In Zendo?
There are four steps to get done to create a client portal in Zendo, all can be completed in under 30 minutes. Step one involves working on our client portal sidebar, aka, adding all the elements we want it to have, renaming them, and working on their order and look. Step two is adding our services, order forms, working on the checkout pages & Service Catalog. Step three is customizing & white labeling our client portal, for example by connecting a custom domain. Lastly, step four is to simply invite your clients to access your client portal.