Most articles about IT self-service portals read like a checklist pulled from the same three sources, saying that you need to have a knowledge base, a service catalog, and a ticket tracker.
What they never tell you is that none of that matters if nobody actually uses the thing.
This guide covers both: how to actually build an IT self-service portal (two versions, in fact, since the same underlying tool can serve your internal team and your clients) and how to get people to use it instead of routing around it.
What Is an IT Self-Service Portal (and What It Isn’t)
An IT self-service portal is the front door employees or clients use to get IT-related help or services without opening an email thread or calling someone.
Instead of “hey can someone unlock my account,” “heyyyyy, so I kinda forgot my password again ☺️), or “I want to buy an SEO tech audit,” it’s a form, a status they can check, and (ideally) an automated fix, all on the same, easily-accessible platform.
With no humans required for the routine stuff (so that IT experts can focus on the hard parts of their jobs!)
Now, people use the term loosely, but when you strip out the marketing language, it almost always boils down to five things:
- A knowledge base: self-serve answers to the questions people ask most.
- A service catalog: a menu of requestable things (new laptop, software install, access to a shared drive).
- Request/ticket tracking: a way to submit something and see where it stands, instead of wondering if anyone read the email.
- Automated actions: the requests that resolve themselves without a human touching them (password reset, account unlock).
- Status visibility: knowing what’s happening without having to ask.
Now, this same pattern shows up whether you’re building it for employees or for clients.
An internal IT team fielding “I’m locked out of my laptop” and an agency fielding “can you add a new page to my site” are solving the same structural problem.
Too many requests coming in through too many unstructured channels (email, Slack DMs, hallway conversations), with no visibility into what’s been done and what hasn’t.
The portal is the fix in both cases. What changes is what’s in the catalog and who’s paying (or not) for what.
That’s also why we’re building this in Zendo rather than a traditional ITSM platform—it’s built around exactly this pattern (catalog, requests, statuses, communication) and it lets you spin up more than one branded portal from the same account, so the internal and client-facing builds can live side by side.
The Problem Nobody Talks About: Adoption
Before we get into actual building, though, let’s talk about one of the biggest problems of self-service IT portals: adoption.
Go read any thread of IT people discussing self-service portals and you’ll notice something: almost nobody is arguing about which features to add.
They’re arguing about the fact that half their users still call the help desk instead of using the portal that already does what they need.
A portal with three features that people actually open beats a portal with twenty features that lives on page two of the intranet.
So before touching any settings, scope down.
Look at your last month of tickets and find the requests that are: (a) frequent and (b) low-risk to automate or self-serve.
Password resets, software installs, and access requests are the classic starting three because they’re common, standardized, and rarely require judgment calls.
Build for those first.
You can always widen the catalog once people are actually in the habit of using the portal, adding scope to something people already trust is easy; getting people to trust something bloated on day one is not.
We’ll come back to adoption tactics specifically once the build is done, but keep this framing in your head through the next two sections: every feature you add should answer “will this make someone more likely to use the portal instead of emailing me,” not “does this look complete.”
Building the Internal IT Ops Portal in Zendo
Building the internal IT ops portal starts with establishing requests that are key to your business.
Start with Adding the Requests
Before opening Zendo, write down what actually belongs in the catalog.
Based on what’s genuinely low-risk and high-frequency in most internal IT setups:
- Software installation requests
- Hardware requests (new laptop, monitor, peripherals)
- Access requests (shared drives, distribution lists, shared mailboxes)
- MFA/authenticator reset
- VPN access requests
- Onboarding/offboarding checklists
- Content-filter exception requests (access to a blocked site/tool)
- Password reset and AD account unlock
For each of these, create a new Request Type in Zendo.
We’ll walk through “Password Forgotten” as an example that shows the pattern you can repeat for the rest of the list.
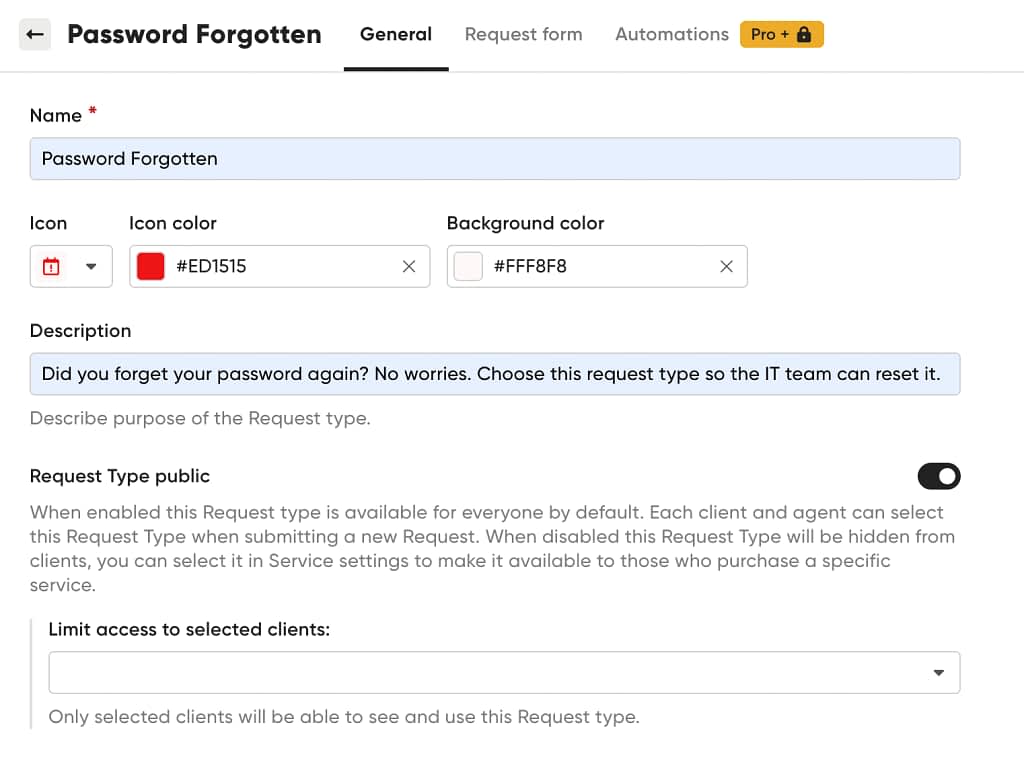
Under General, name the Request Type something a non-technical employee would actually recognize, so in this case: “Password Forgotten,” not “AUTH-RESET-001”.
Give it an icon, an icon color, and a background color so it’s visually scannable in the portal and the Requests queue later. The description field is worth taking seriously too; it’s the first line of self-service, telling someone what this option is for before they even open the form.
Toggle Request Type public on so any employee can select it without a special invite, or limit it to selected clients/employees if it’s something like a restricted-access request.
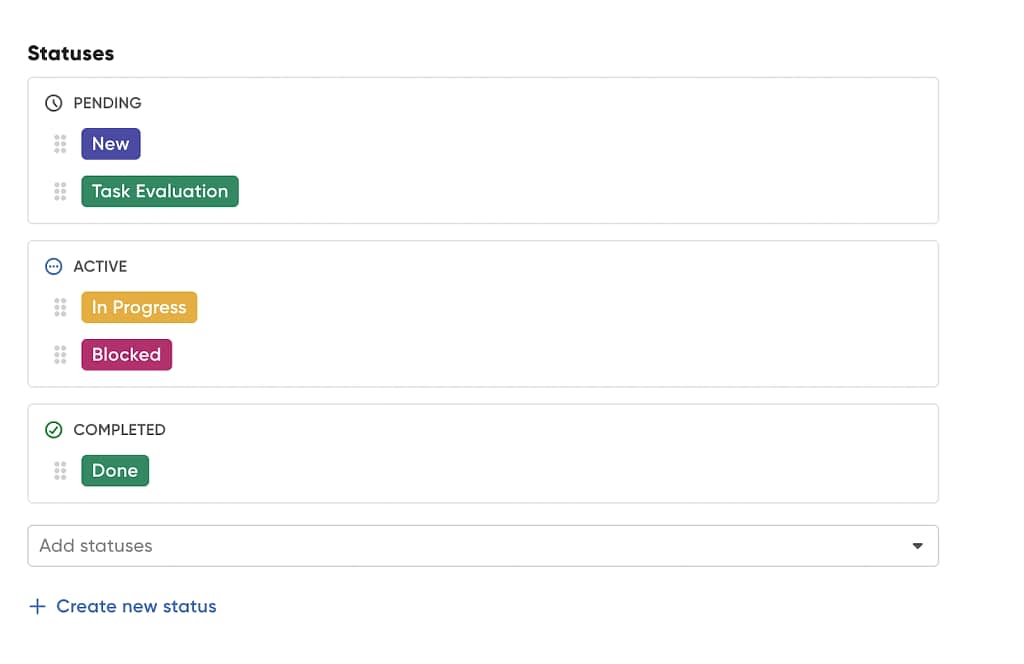
Below that, you’ll see the Statuses this Request Type moves through, grouped into Pending, Active, and Completed columns.
You can move through stages, such as New and Task Evaluation → In Progress and Blocked, all the way to Done. These will drive the Kanban queue and the automation triggers you’ll set up next, so it’s worth deciding your status names now rather than mid-build.
Underneath, Custom fields is where you define what information you actually need from the requester, something that will show up directly in the request chat window.
Like “Did you have 2FA installed?”.
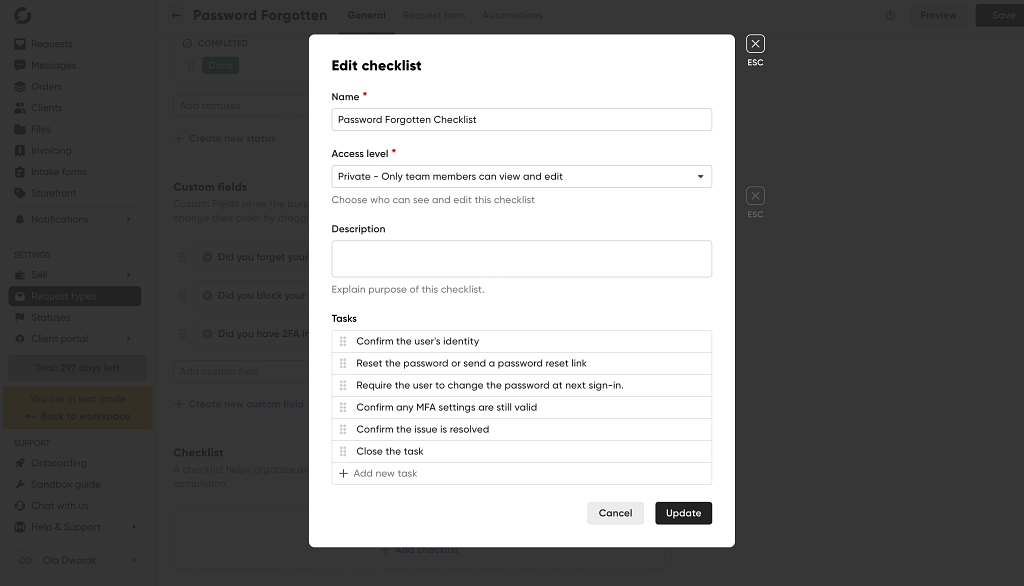
Next, tackle the Checklist that lets you attach an internal, private task list (“Confirm the user’s identity,” “Reset the password or send a reset link,” “Confirm any MFA settings are still valid,” “Close the task”) so whoever picks up the request has a consistent procedure to follow.
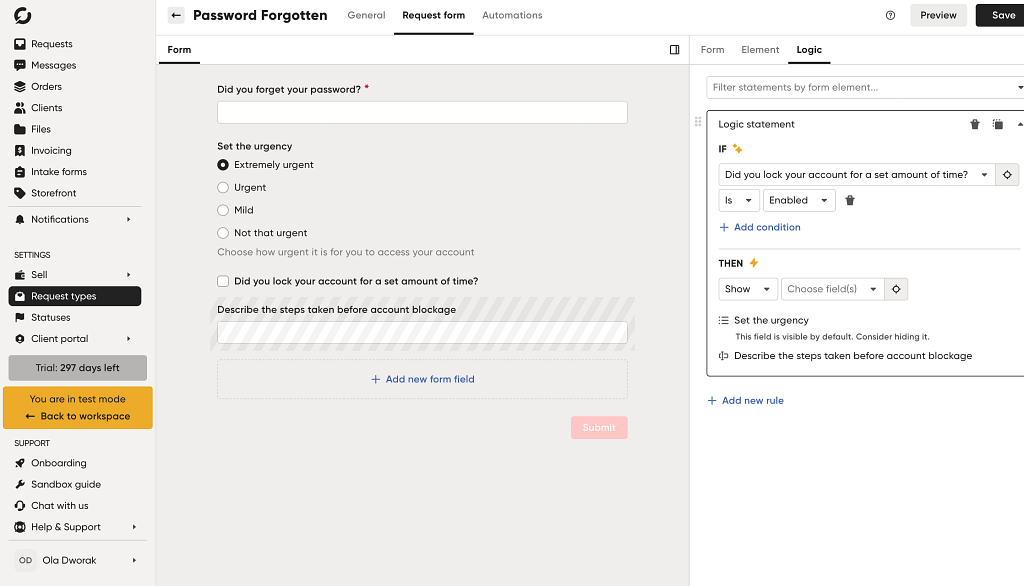
Moving on to the Request form tab, which is where you gather more detailed information, and where conditional logic lives.
In the example above, checking “Did you lock your account for a set amount of time?” triggers a rule that shows a “Describe the steps taken before account blockage” field; so the form only asks for detail when it’s actually relevant.
The Preview button lets you see exactly what the requester will see and fill it out yourself before publishing as a quick way to catch a form that reads fine to you but may be confusing from the requester’s side.
Once the form itself is solid, the Automations tab is where you decide what happens after submission.
Set up Automations
In Zendo, each service or request type is defined by Automations.
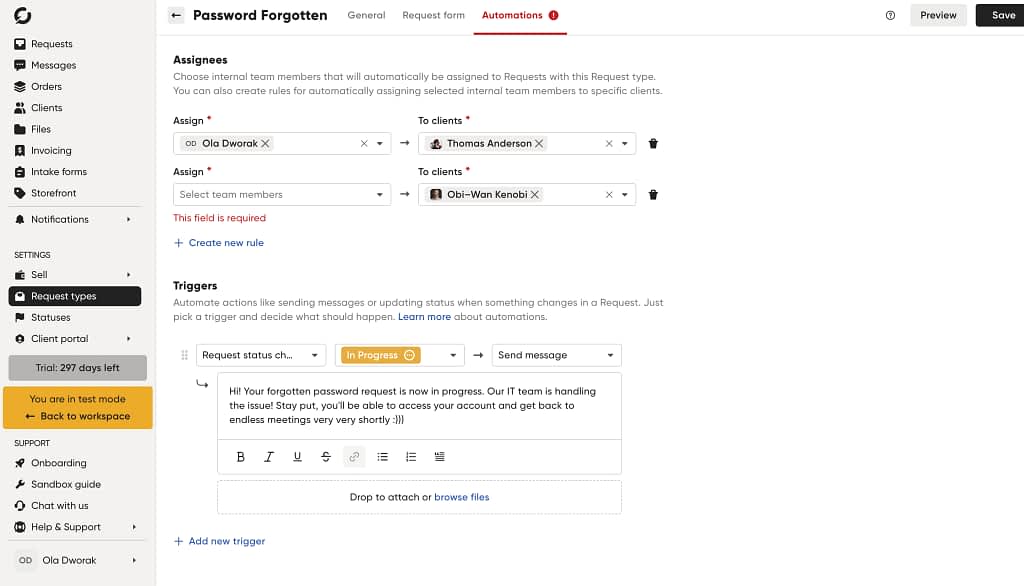
Starting with Assignees is where you decide who’s on the hook for a given request. You can route different clients or employees to different team members rather than dumping everything on one inbox.
In the “Password Forgotten” example, Ola Dworak (me, hihi) is assigned to handle requests from Thomas Anderson, with a second rule ready to route Obi-Wan Kenobi’s requests to a different team member.
Triggers are where you automate the boring, but necessary parts of the workflow itself, such as sending a status update, moving a request to a new state or sending employees a message, without anyone having to remember to do it manually.
Each trigger follows the same shape: pick what changes (a request status change, for instance), pick the value it changes to, and pick the action that fires in response.
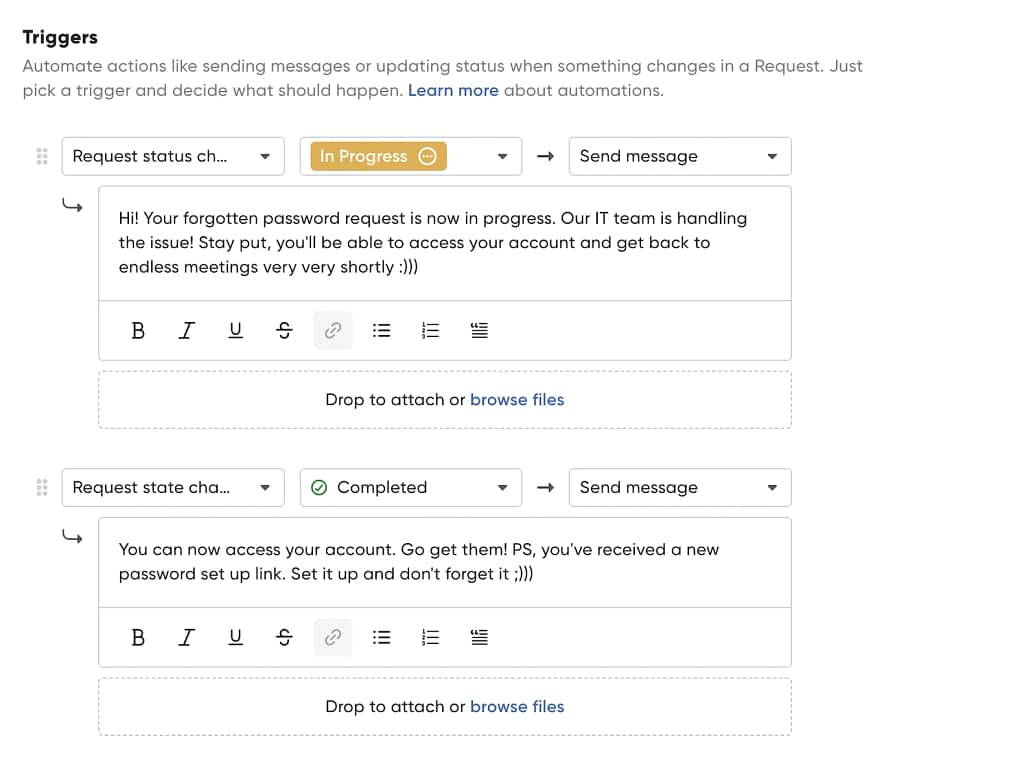
In this example, two triggers do the entire client-facing communication for the request:
- When the status changes to In Progress, a message goes out automatically confirming the request is being worked on.
- When the status changes to Completed, a second message lets the requester know they’re back in and flags that a new password link has been sent.
Define Roles Before You Open This up
This matters more on the internal build than the client-facing one: not everyone should be able to trigger every action.
Zendo has five roles: Watcher, Agent, Manager, Admin, and Owner.
Each with a different level of access to requests, workflows, and team management.
For example, only Admins and Owners can assign roles, create or edit request types and forms, or invite team members; Agents and Managers can work requests and issue quotes/invoices but can’t touch the underlying workflow setup; Watchers can only view what they’re assigned to.
Set this up under Settings → Client portal → Internal team: find the team member, open the actions menu, and select Change role before you push the IT portal live.
The Requests View is Your Internal Queue
Once requests start coming in, you (and your team) work out of the Requests tab, switchable between List, Table, and Kanban views.
Kanban is generally the most useful for an internal queue since it gives you an at-a-glance view of what’s stuck where, organized by status columns like Active (with Blocked and In Progress) and Completed (Done).
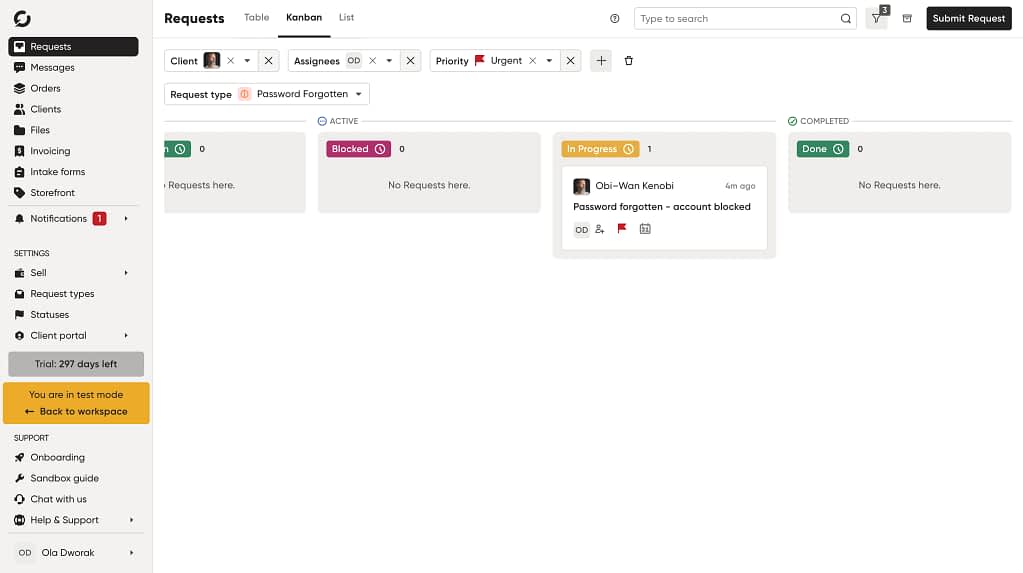
Filters are what make this actually usable once volume picks up. Stack Client, Assignees, Priority, and Request type filters on top of the board to narrow it down to, say, every urgent request assigned to a specific technician instead of scrolling a board with everyone’s tickets mixed together.
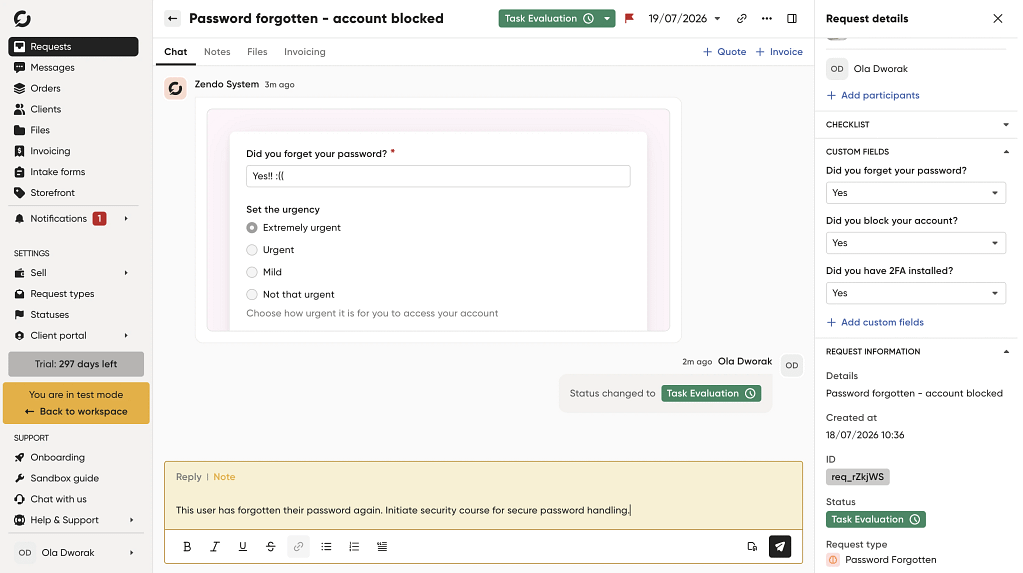
Clicking into a specific request opens a dedicated thread rather than a static ticket, with real-time chat communication as the center.
The submitted form sits at the top so the context is right there, no digging through email to find what the requester originally said.
From there, replies go to the requester and notes stay internal, both from the same box, so a technician can log something like a reminder to follow up on password hygiene without that note ever reaching the client.
The sidebar keeps the checklist, custom fields, and request metadata (ID, status, created date, request type) visible the whole time, so there’s no tab-switching to find the details that matter while you’re actually working the request.
This alone eliminates a lot of the back-and-forth that makes internal IT requests feel slower than they are.
Design for the Internal Side
For an internal-facing build, prioritize familiarity over polish.
Match what employees see to the terms and structure they already use internally.
And in Zendo, that’s controlled at two levels: workspace-wide branding, and per-sidebar configuration.
Workspace-wide branding (under Client portal → Branding) sets the defaults everyone inherits: an accent color for links and buttons, a main logo, a favicon, and—on higher plans—a custom domain, a named/branded chatbot, and the option to remove the “Powered by Zendo” badge entirely.
The Sign up & Login tab lets you hide social login and swap in your own image on the auth pages, and the Emails tab adds a custom footer to outgoing notifications.
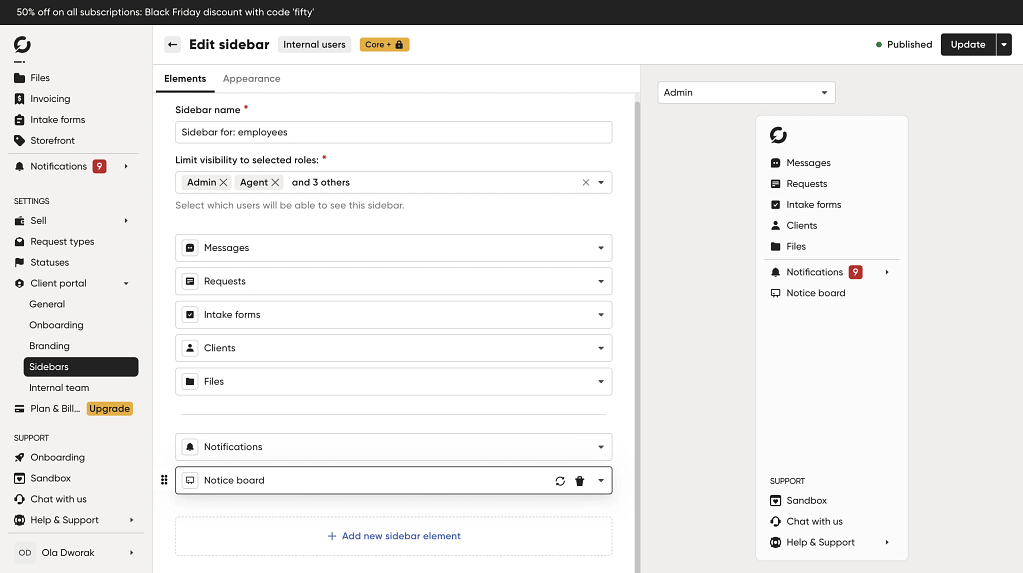
Sidebars are where the internal/client split actually happens.
Zendo lets you create multiple sidebars and limit each to specific roles; so your internal team sees an entirely different navigation structure than clients do, from the same account.
Name the sidebar itself (e.g. “Sidebar for: employees”), then restrict visibility to the roles that should see it. Below that, drag to reorder, add, or remove individual elements (Messages, Requests, Intake forms, Clients, Files, Notifications, and new things, like an internal-only Notice board for team announcements).
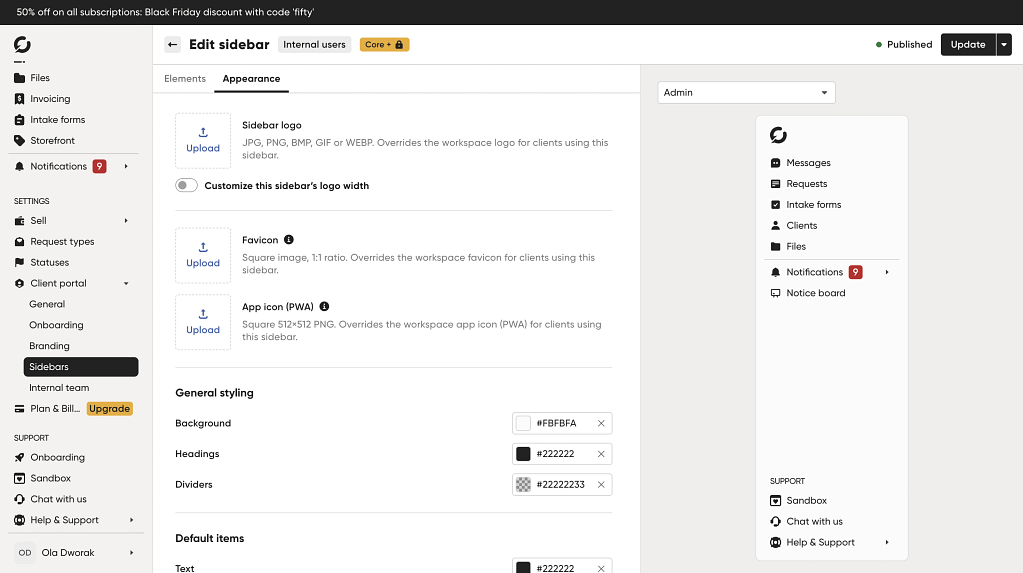
The Appearance tab lets this specific sidebar override the workspace defaults, its own logo, favicon, and color palette. Branding matters less here than on the client side, but a recognizable logo and color scheme still signals “this is official, not some random tool IT tried once.”
Cherry on Top: Knowledge Base Swap
Every Zendo workspace ships with a default Help Center link to Zendo.
For an internal build, replace it with a link to your own knowledge base or wiki.
A quite simple setting change that can really save some headaches of commonly asked questions. Like how to set up a new password or how to submit a request.
Add in the most frequently asked questions by employees and make it all around easier.
Add a Security Layer
Since this portal is where password resets and account unlocks now live (among other often sensitive IT requests), it’s worth locking down access to the portal itself before you open it up.
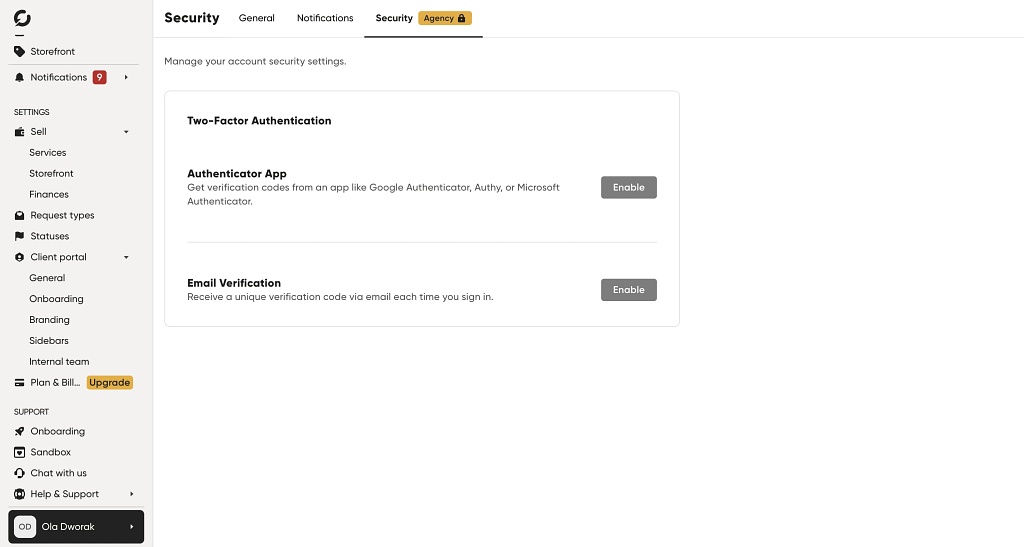
With Zendo you can do more than just a simple password and email log in.
Under Security, each team member can enable two-factor authentication, either via an authenticator app like Google Authenticator or Authy, or via a one-time code sent to email.
It’s worth requiring 2FA for anyone with Admin or Owner access at minimum, and encouraging it across the rest of the team.
Building the Client-Facing IT Portal in Zendo
Now for the second build, the underlying pattern is the same: request types, statuses, custom fields, and automations.
What changes is that clients are paying for what they’re requesting, so the catalog is built out of Services rather than free-standing request types, and request types now sit downstream of a purchase instead of being the entry point themselves.
Set up the Services and Storefront
Zendo supports both one-off and recurring services, and an IT client portal will usually need both.
A one-time engagement, like an SEO technical audit, a network assessment, a migration project, this all fits a productized service with a fixed price.
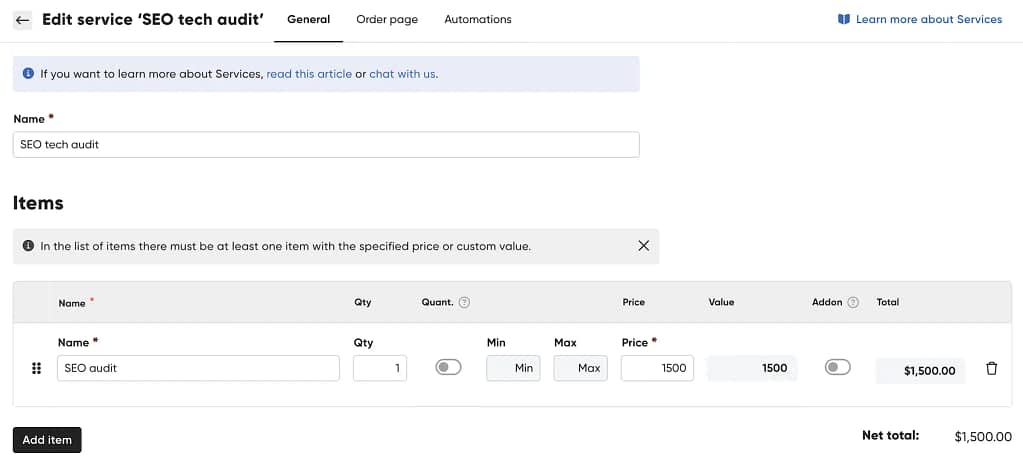
Under the General tab, you define what’s actually being sold as line items (name, quantity, price), and Zendo totals it automatically.
The Order page tab is where you build out how it’s presented to the client when ordering.
A service image and description, plus an order form the client fills in before checkout, so you’re capturing the details you need (project scope, site URL, whatever’s relevant) at the point of purchase rather than chasing it down afterward.
Recurring work, like an ongoing support retainer, an “unlimited IT requests” plan, or any other IT work package sold on a recurring basis, fits the subscription service type instead, which supports multiple tiered packages (e.g., Basic, Standard, Premium) each with their own description, price, and billing cycle.
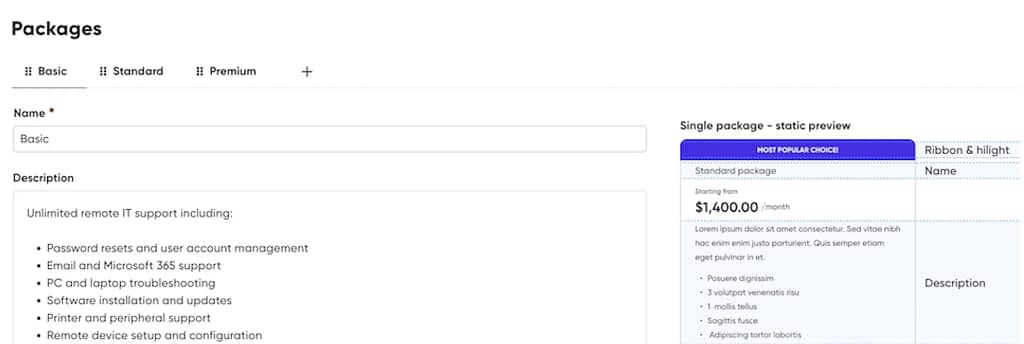
Each package can carry its own description of what’s included, an optional free trial, and separate pricing per billing cycle (weekly, monthly, quarterly, yearly). Useful if you want to nudge clients toward annual commitments with a discount. 😉
The Automations tab on any service is where the request-type connection happens: enable Automatic request creation to have a Request Type generated the moment the service is purchased, and choose whether the client fills in the request form immediately at checkout or after purchase.
This is where request types come back in.
So the same request types you’d build for the internal portal work here too, just triggered by a purchase instead of submitted directly.
The Storefront ties these services into a single browsable menu your clients will be able to visit and purchase things from.
Set up the Sidebar
The sidebar setup works the same as the internal build.
So name it, restrict it to client-facing roles, and choose which elements to show.
The difference is what’s worth including: alongside Requests and Messages, a client sidebar typically adds the Storefront (so clients can browse and order services directly), Quotes & Invoices, and Files.
If you’re managing ongoing client projects delivered through these IT services, this is also a natural place to link out to shared documentation or a project tracker via an external app embed.
Onboarding
First-login confusion is one of the fastest ways to kill portal adoption before it even starts, so for a client-facing portal, make sure to add proper onboarding.
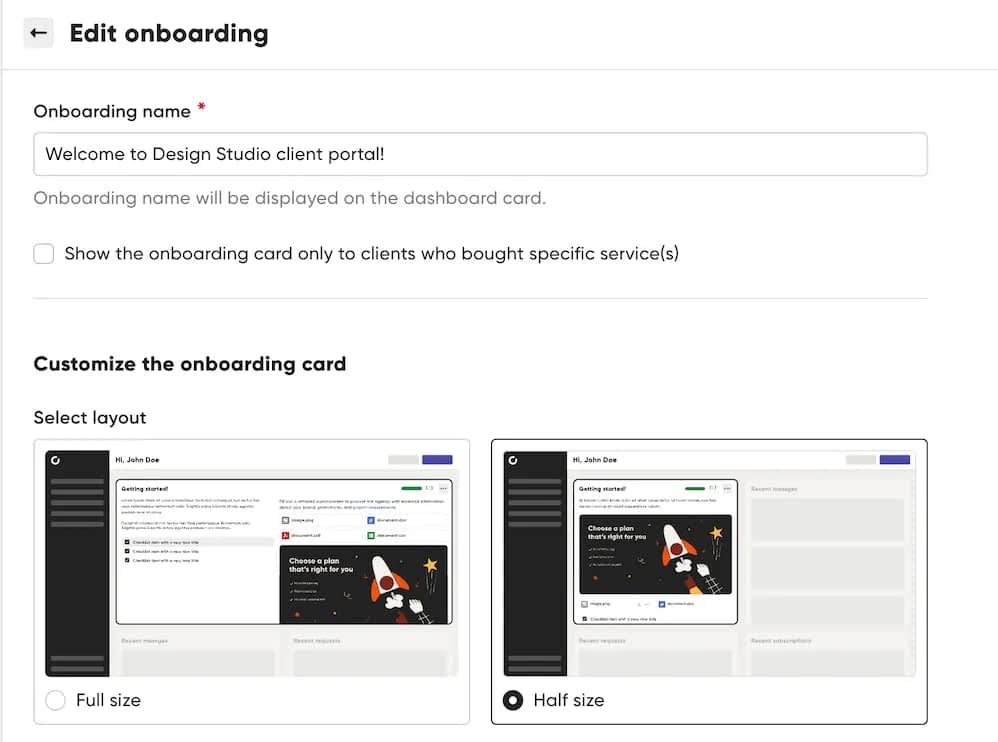
Zendo’s onboarding builder lets you create a welcome message, attach files or short videos, and add a checklist of first-steps tasks shown directly on the client’s dashboard the first time they log in.
You can create different onboarding flows for different client segments if your service tiers differ meaningfully, for example, a Basic-tier client might just need a “submit your first request,” while a Premium retainer client’s onboarding could point them straight to their dedicated account manager.
Worth noting: onboarding isn’t exclusive to the client-facing build.
Adding a lightweight onboarding flow to the internal IT portal too, even just a three-item checklist, isn’t a bad idea, given how much Section 2 hinges on people actually knowing the portal exists and what it does.
What’s Different Here vs. the Internal Build
A few things exist specifically because clients are on the other end:
- Payments and invoicing: quotes, invoices, and payment requests can be sent automatically, with Stripe checkout or bank transfer as options
- Impersonation: you can temporarily view the portal as a specific client to troubleshoot what they’re actually seeing, rather than guessing
- Client profiles: full history of a client’s requests, files, and orders in one place, so nobody on your team has to dig through old email threads to answer “what did we agree on last time”
Driving Adoption (The Part Everyone Struggles With)
Coming back to Section 2’s point: none of the above matters if people don’t use it.
A few things actually move the needle:
1️⃣ Make the self-serve portal the default, not an option. Put the portal link where people already look. Like the intranet homepage, email signatures, the first line of your out-of-office autoresponder for the help desk inbox. If people have to remember it exists, most won’t.
2️⃣ Make the design seamless with wherever people already are. For the client-facing portal, this means matching your existing website and brand closely enough that logging in doesn’t feel like leaving your site. For the internal portal, it means using the language and visual identity your company already uses internally, so it reads as an extension of existing tools rather than a new one to learn.
3️⃣ Redirect the workarounds, don’t just tolerate them. If someone emails a request that has a direct self-service equivalent, respond with a link to the portal rather than just handling it via email. Because every time you fully resolve the workaround, you reinforce that the workaround is fine. This feels unhelpful in the short term and pays off within a few weeks as people build the new habit.
4️⃣ Route approvals through the same door. Anything that needs a manager’s sign-off should still start as a portal request, with the approval step handled inside that same workflow. Every exception you carve out is a reason for someone to skip the portal next time too.
Common Pitfalls
❌ Skipping onboarding. A portal with no explanation of what it does or how to use it will get one visit and no second one. Use Zendo’s onboarding flows to walk first-time users through the basics rather than dropping them into an empty dashboard.
❌ Overcomplicating the catalog. More services in the catalog isn’t automatically better. A bloated menu makes people hunt for the right option, which is exactly the friction you’re trying to remove. Start narrow (Section 2’s approach), and only add once the essentials are clearly working.
❌ Leaving the old channels fully open. If email and phone still resolve everything just as fast as the portal, most people will keep using them out of habit. This means consistently redirecting routine requests back to the portal instead of quietly handling them the old way.
❌ Ignoring feedback about the portal itself. If people are telling you it’s confusing, slow, or missing something obvious, that’s the signal to change it—not a reason to explain why they should just get used to it. A portal people actively dislike using will get abandoned regardless of how complete its feature list is.
So, Overall…Is a Self-Service Portal Worth It in IT?
Short answer: yes, but the payoff shows up in specific places, not everywhere at once.
The clearest win is volume. Every request that resolves itself, a password reset, a status check, a software install, is one your team never has to touch. That doesn’t mean less work overall; it means the hours your IT team does spend go toward the requests that actually need a person’s judgment, instead of getting eaten by the routine stuff.
The second win is visibility. “Did anyone see my email?” stops being a question anyone has to ask, because the status is sitting right there. That alone tends to cut down on the follow-up messages that clog up a shared inbox.
The tradeoff is upfront effort: someone has to define the catalog, write the forms, and set up the automations before any of that pays off. For a small team fielding a handful of ticket types a week, that setup cost might not be worth it yet. For a team fielding dozens of repetitive requests, it usually pays for itself within the first month just in hours reclaimed.
Not Just IT: Where Else This Pattern Shows Up
Everything above describes an IT helpdesk self-service portal specifically, but the underlying pattern isn’t unique to IT.
HR runs almost the same playbook for employee self-service: PTO requests, benefits questions, onboarding paperwork, all funneled through one web-based front door instead of a shared inbox. Facilities teams use it for maintenance requests and access badges. Customer service desks use it for support tickets and product questions.
When a company runs several of these side by side under one system, rather than siloed by department, it’s usually called enterprise service management (ESM): the same service desk logic (catalog, request tracking, automation) applied across HR, facilities, IT, and customer-facing support instead of living in IT alone.
Most modern self-service portals, IT or otherwise, are cloud based either way.
A cloud based self-service IT portal doesn’t need a server anyone patches, it’s reachable from a browser, and updates roll out without scheduling downtime around them.
Zendo, and most tools like it, work this way, so standing one up looks more like configuring an account than running an IT operation of its own.
So building one is really a matter of a bit of a time-investement upfront. But that’s about it.
Build an IT Self-Service Portal That’ll Actually Be Used
An IT self-service portal isn’t really about the feature list. A knowledge base, a catalog, ticket tracking, and automation are table stakes, not differentiators.
What actually determines whether one works is whether people choose to use it over the alternative they’re used to.
Building it in Zendo means you can stand up both versions from the same account:
- an internal ops portal optimized for existing-tool familiarity, with request types, role-based permissions, and 2FA locking down anything sensitive,
- and a client-facing portal optimized for brand polish, with services, subscriptions, and automatic invoicing doing the selling for you.
If you want to see how much of this you can get running in an afternoon, Zendo has an extensive free trial worth poking around.
FAQ
What’s the Difference Between an IT Self-Service Portal and a Traditional Help Desk?
A traditional help desk requires a person on the other end for every request, like an email, phone, or ticket that a human then reads and acts on. A self-service portal handles the routine of submitting those requests without anyone needing to step in. The human of course takes the action to resolve more complicated requests. Simpler ones could even be fully automated.
Do I Need a Full ITSM platform, or Can a Tool Like Zendo Cover This?
For the catalog, request-tracking, and communication layer, a tool like Zendo covers it directly. For actions that require touching backend systems, like directory-level password resets that are fully automated, you’ll need to bridge that gap with an integration or a different platform.
Can the Same Portal Serve Both Employees and Clients?
Yes! Zendo supports multiple branded portals, so you can run a client-facing version and a separate internal-ops version side by side, each with its own catalog, branding, and access rules.
How Long Does it Actually Take to Set One up?
The base build of a sidebar, a handful of services, basic branding, and request types can realistically be done in under an hour. The parts that take longer are the ones that matter more for adoption: writing decent intake forms, populating a knowledge base, and setting up any backend integrations.
What Should Be In the Catalog First?
Whatever shows up most often in your last month of tickets and carries the least risk if automated, like password resets, software installs, and access requests are the near-universal starting three. Expand from there once people are actually using it.
Is a Self-Service Portal the Same as a Knowledge Base?
No. A knowledge base is one piece of a self-service portal, not the whole thing. It covers the “how do I do this myself” questions with articles and guides. A self-service portal wraps that together with a service catalog, request tracking, and automation, so people can both find an answer and take action (submit a request, check a status) in the same place.
What Kind of Information Should Be Available Through a Self-Service Portal?
At minimum: the answers to the questions people ask most often, a clear menu of what can be requested, and enough form fields per request type to act on it without a follow-up email. Beyond that, status visibility (what stage a request is at) and a request history matter more for adoption than any amount of extra documentation.
What Are the Key Challenges When Implementing an IT Self-Service Portal?
The technical build is rarely the hard part. The real challenges are scope creep (packing in every possible request type before anyone’s built the habit of using the portal at all) and adoption (people defaulting back to email or Slack out of habit). Both are covered in more detail in the Common Pitfalls section of this article.